creating podcasts using audacity and itunes
rose pruyne
the pennsylvania state university
getting started: connecting mic and headphones (windows)
 Plug mic into the microphone-in connection on the back or side of your computer.
 Plug headphones to the stereo line-out or headphone jack (often these are the same).
- Resource: Video: Audacity Setup
getting started: configuring audio input and mic volume (windows)
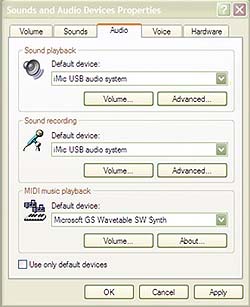
- In Windows Start menu, go to Windows => Settings => Control Panel => Sounds, Speech, and Audio Devices (or Sounds and Audio Devices) => Audio => Sound Recording.
- in the Sound Recording menu, select microphone.
- click Volume and adjust mic volume.
- Resource: Video: Audacity Setup
getting started: a few words about storing your files
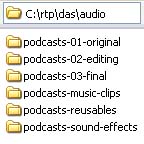
- Archive your original recordings until you are certain that you no longer need them.
- Sort your files into originals, edit, and final.
- Start a library of reusables:
- Opening music with intro.
- Closing music with outro.
- Tags with copyright info, contact information, etc.
- Assemble a library of music clips and sound effects.
- Make incremental backups.
- If you change directory structure after configuring audacity, you will need to reconfigure Edit => Preferences => Directories or Audacity will bark at you.
- Consider getting an external hard drive. Or two.

recording and editing in audacity: making your first recording
- Select
 Record and begin talking.
 - Select
 Stop when you are finished.
 - Select
 Skip to Start to go back to the beginning to your recording.
 - Select
 Play to listen.
- Resource: Video: Audacity Tools
recording and editing in audacity: viewing your recording
- Zoom
- Select
 Zoom, then right-click on your audio work area to zoom in.
 - Left-click to zoom out.
- Stretch a track to get more detail.
- Mouse over the bottom edge of the track until the double-headed arrow appears.
- Pull down on the bottom edge of the track.
- Ruler (timeline)
 .
. - Indicates duration in minutes and seconds.
- Resource: Video: Audacity Tools
recording and editing in audacity: trimming
- Click
 Select.
 - Select region of track to remove.
- Click
 Cut or select edit => delete .
 - You can also use control/x or the delete key on your keyboard to delete a selected track region.
- Resource: Video: Trimming in Audacity
recording and editing in audacity: adjusting volume
- Click Select.
- Select region to adjust.
- Select Effect => Amplify.
- 0 db indicates no change.
- 8 decibels means 8 decibels louder than current volume.
- Allow Clipping allows you to jack up volume even higher, however, this also clips highs and lows (which affects quality).
- Edit => Silence replaces the selection with silence.
- Resource: Video: Working with Levels in Audacity
recording and editing in audacity: positioning audio
- Click Select.
- Select the track region that you wish to reposition.
- Click
 Timeshift.
 - This allows you to slide audio to different positions on the ruler (timeline).
recording and editing in audacity: fading
- Click Select.
- Select the track region that you wish to reposition.
- Select either Effect => Fade In or Effect => Fade Out.
recording and editing in audacity: id3 tags
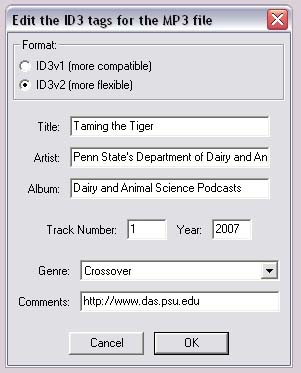
Note that audacity does not allow you to select Podcast as the genre. This must be handled in iTunes.
- Resource: Video: Saving and Exporting in Audacity
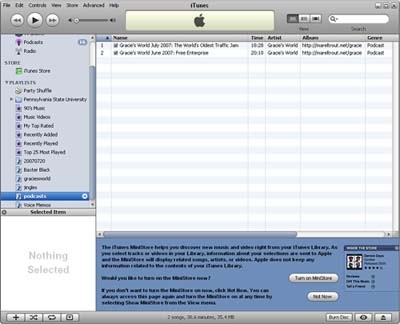
working with iTunes: the iTunes desktop client

- Open iTunes.
- Create a new playlist called podcast (this sets up an uncluttered work area for managing your podcast's metadata).
- Drag the mp3 of your finished podcast into this playlist.
- Click within each tag area (Name, Time, Artist, Album, etc.) and enter your metadata.
- The time will already be indicated for you.
- Type Podcast for the genre.
- Be consistent with this information from podcast to podcast.
uploading your podcast to iTunes U: opening iTunes
1. Open iTunes on your desktop.
- Resource: Video: How to Manage Podcasts on iTunes U.
uploading your podcast to iTunes U: logging in
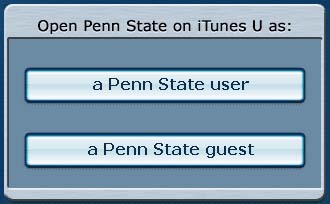
3. Log in as a Penn State user with your Penn State userid and password.
uploading your podcast to iTunes U: closing confirmation window
 4. You will be redirected to a page that says OK. Penn State iTunes U will automatically open within iTunes.
uploading your podcast to iTunes U: navigate to your space

5. In iTunes, navigate to your iTunes U space.
uploading your podcast to iTunes U: the upload files link
 6. Within your iTunes U space, follow the Upload Files link. This takes you to the web page for uploading and managing files.
uploading your podcast to iTunes U: add tracks link
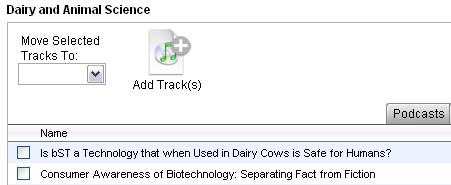
7. Click Add Track(s).
uploading your podcast to iTunes U: browse to your file
8. An Upload to Podcasts form field will appear near the bottom of the web page. Use this form to browse to your file and select it. the file will immediately begin uploading to your iTunes U space. Once it's uploaded, your work is done.
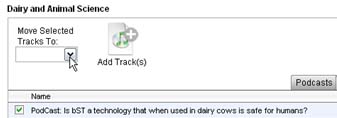
managing your podcasts on iTunes U: removing a podcast
To remove a podcast, click the checkbox next to the podcast and in the pull-down menu Move Selected Tracks To: select Trash.
managing your podcasts on iTunes U: replacing a podcast
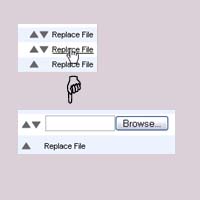
To replace a podcast, click Replace File. Using the Replace File form, browse to and select the new file.
other useful tools: the complete podcast studio
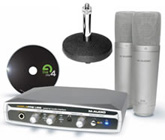 Essential if you plan to have two or more people participating in your podcast and want to provide a quality studio setup.
- M-Audio Classroom Studio Bundle (w/ bonus mic stand) ($266)
- Desktop Microphone Stand ($10)
- Total Approximate Price: $276
- Available at computerstore.psu.edu
other useful tools: the handheld recorder
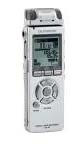
 The Olympus DS-40 is a highly sensitive digital handheld recorder that provides 136 hours of recording with a 30-hour battery life. It connects to your Windows machine by USB. An external clip-on mic is recommended to minimize handling noise.
- Recorder and External Mic: Approx. $286
- Available from Amazon.
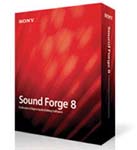
other useful tools: alternate recording software


other useful tools: enhanced podcasting
Create enhanced podcasts
 Create vodcasts and eLearning modules.